The seventh theme for Rapid Prototyping is CYOT, choose your own theme.
[27/04/2022]
When choosing the theme I would use for this, I wrote down various types of games. I wrote small notes next to each type relating to ideas I had for them.
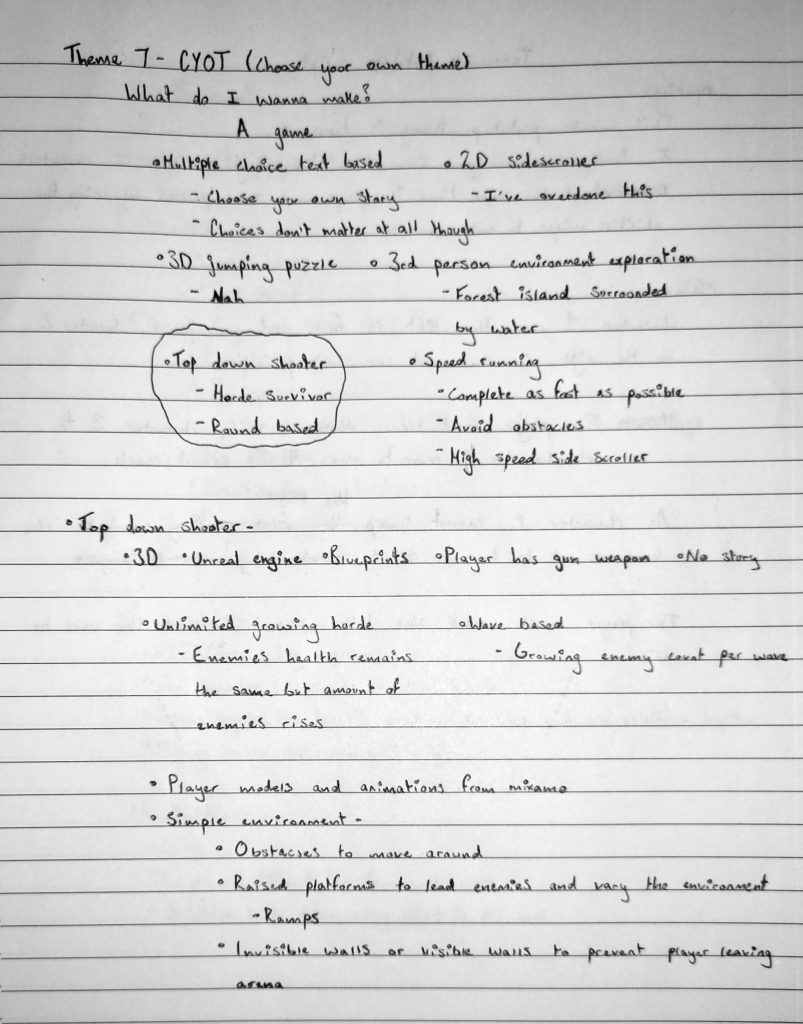
I ended up choosing top down shooter as the theme I would go with. I hadn’t made a top down shooter in Unreal Engine at this point and I have grown to enjoy using it so decided that this is what I would do. After choosing this as my theme, I expanded on the idea by writing down various elements that could be present in the prototype.
To create this prototype, I followed the Third Person Shooter Minigame playlist (2021) by Matt Aspland on Youtube, tweaking certain elements along the way to distinguish it from the series.
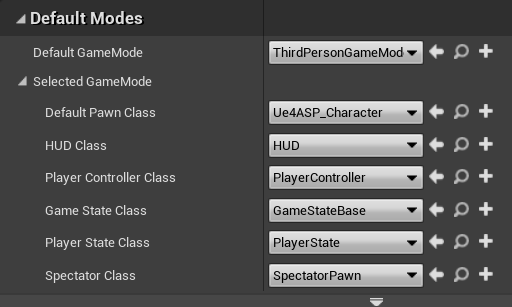
To start the prototype, I created an Unreal project using the third person template. I then imported the Animation Started Pack (2014) from the Unreal Marketplace and chose the included player character as the default pawn class. This character has a pre-made animation cycle as well as pre-made movement and jumping blueprints.
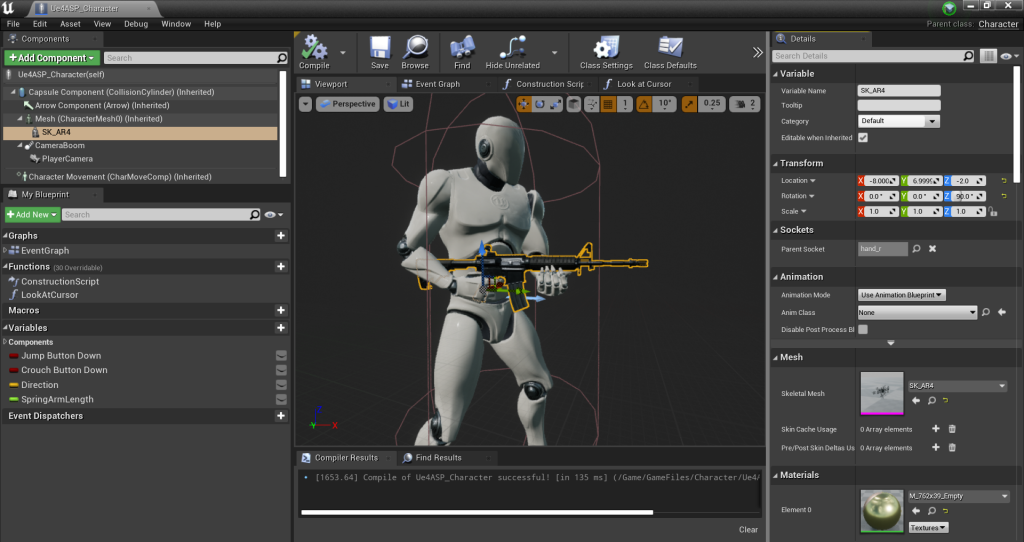
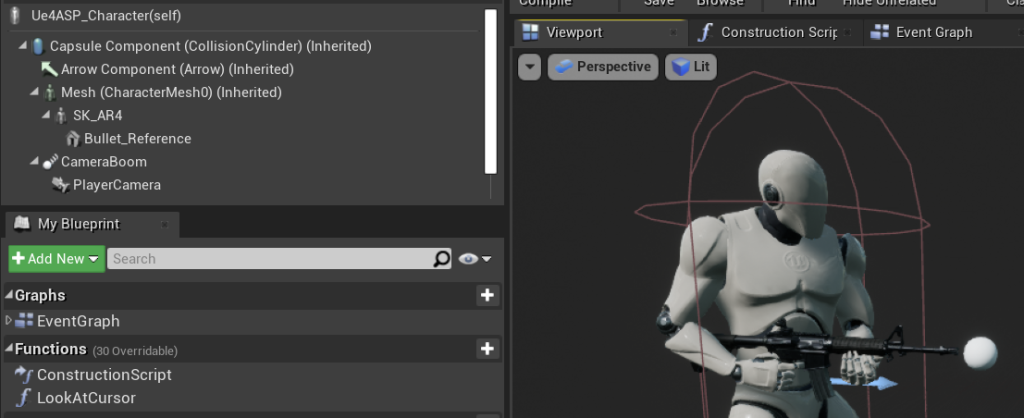
After that I added a gun model to the player character within the viewport. This gun is from the FPS Weapon Bundle (2018) on the Unreal Marketplace. I made this a child of the mesh and made the parent socket the right hand so that the gun would move with the character.
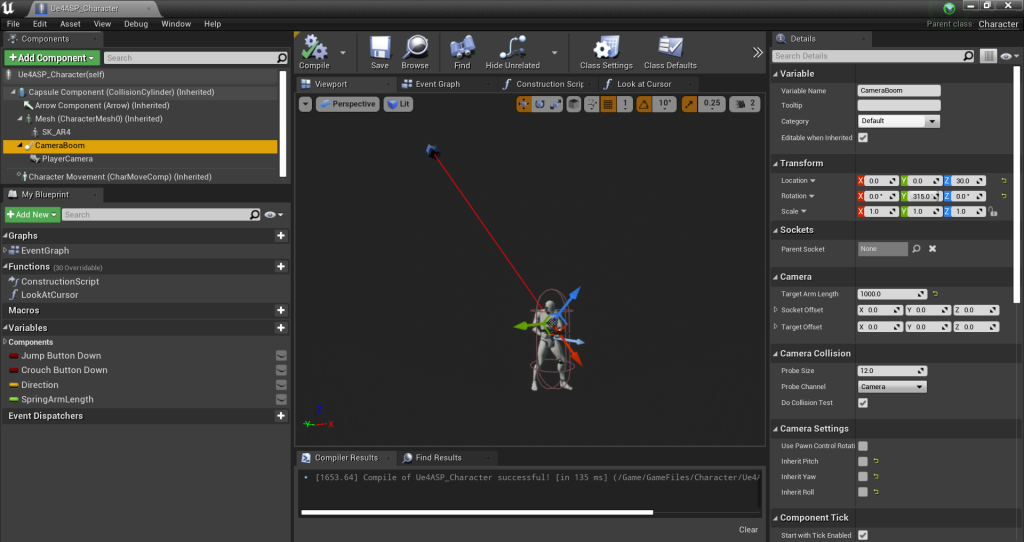
I then moved onto the camera settings. I adjusted the boom arm to be high above the player character so that the view would be top down.
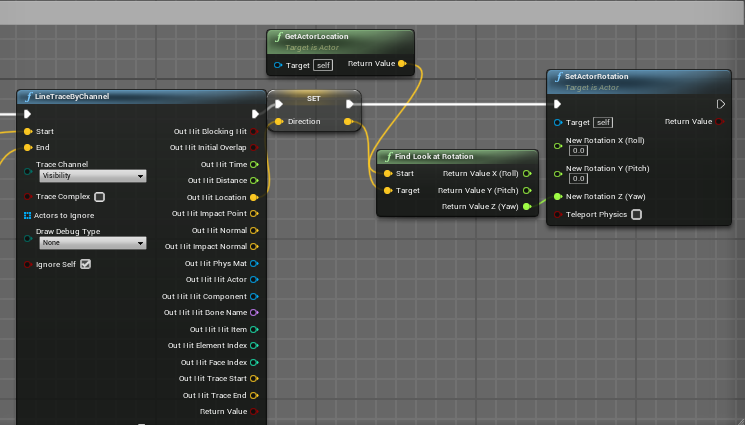
Then, to have the player look at the mouse as it is moved around the screen, I edited the blueprint. I started by making a function that causes the player to face the direction of the cursor based on its location of the screen.

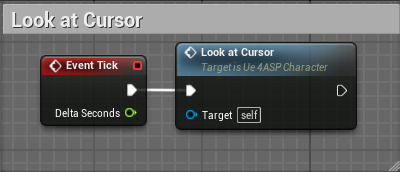
To have the character constantly follow the cursor around the screen, I connected the function to an event tick node.
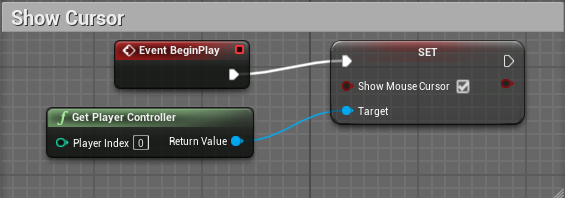
To show the cursor on the screen I set Show Mouse Cursor and set it to true, connecting it to Event BeginPlay so that it would be present from the start of the game.
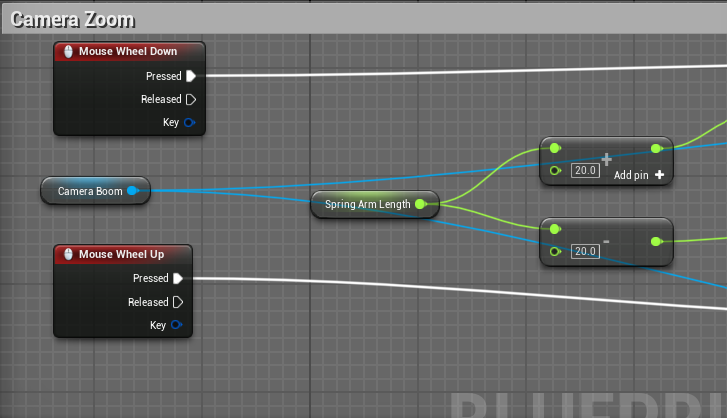
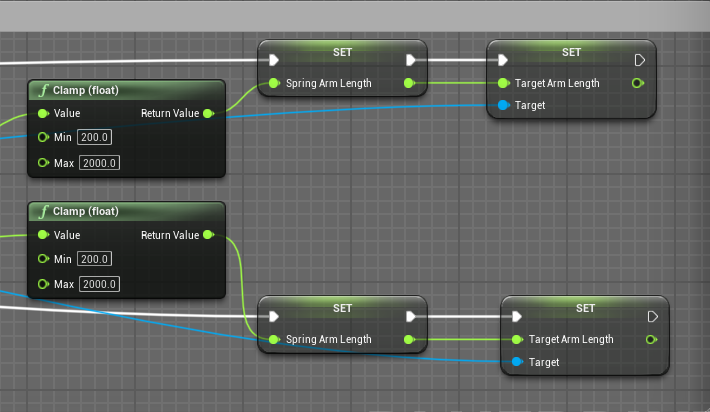
The final element of the camera was zooming in and out. I connected moving the mouse wheel up and down to the length of the spring arm so that the player can adjust how close the camera is to the player.
[28/04/2022]
The next element I worked on was shooting the gun. I used the 5.56 bullet model from the FPS Weapon Bundle (2018) as the projectile model.
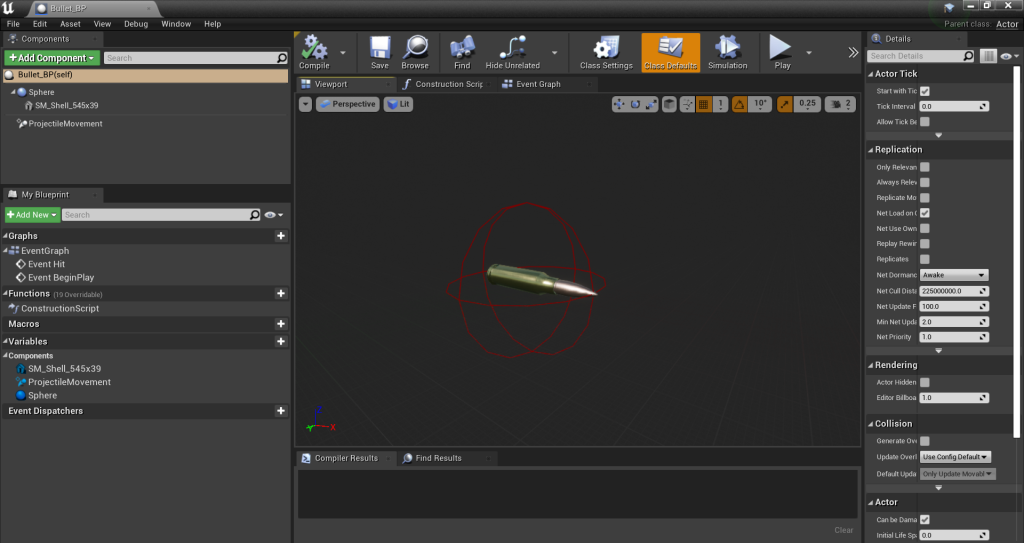
I made the projectile by creating a new actor blueprint. Within this I set a sphere collider as the scene anchor and added the bullet model, setting it as a child of the collider. I then added projectile movement to the blueprint and altered the x-axis speed to 3000 so that it would move when spawned.
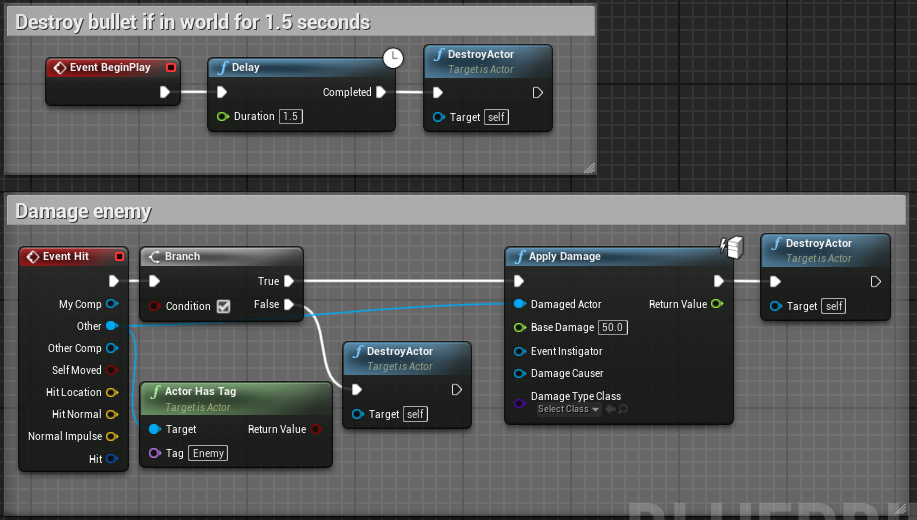
To cause the bullets to deal damage, I connected Apply Damage to Event Hit. To Event hit, I connected Actor Has Tag and set the tag as Enemy. As it has the Apply Damage node connected to it, with the damage set to 50, anything tagged Enemy will take 50 damage if they collide with the bullet projectile. When the bullet collides with something tagged Enemy, it will be destroyed.
I also added Event BeginPlay, connecting a delay set to 1.5 seconds then Destroy Actor. This causes the bullet to be destroyed if it doesn’t collide with a tagged object within 1.5 seconds. This is for the sake of optimization as, without this, the bullet would remain in the world indefinitely.
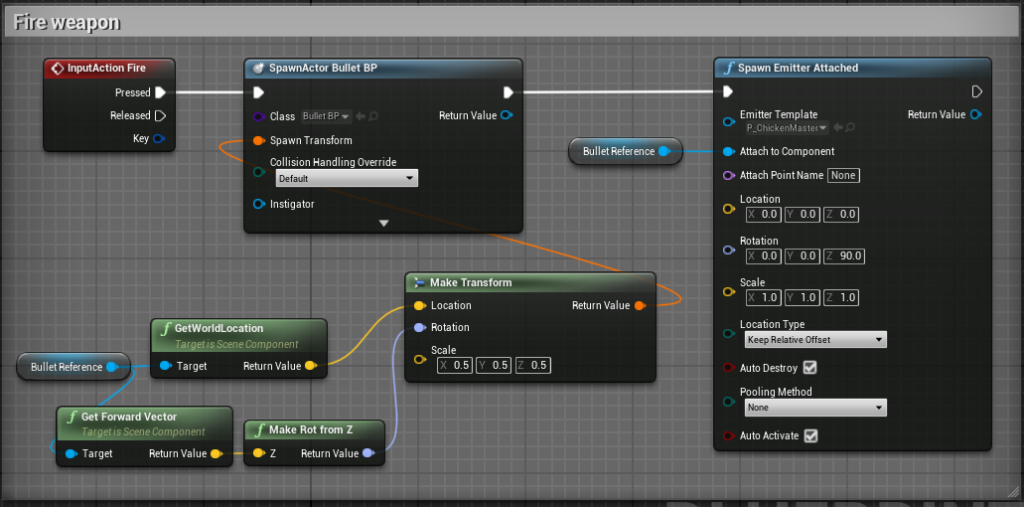
The next thing to do was shoot the bullets. I first added a sphere to the character viewport for the player character, making it a child of the gun and renaming it to Bullet Reference. I shrunk it down and set shown in game to false as it is only a location reference so it doesn’t need to be seen by the player.
I then went into the player blueprint and added InputAction Fire. To this I connected a SpawnActor node with the bullet being the actor. To shoot the bullet from the front of the gun, I set the spawn transform to the location of the Bullet Reference I made prior. Then, to SpawnActor, I connect a Spawn Emitter Attached node connected Bullet Reference to the Attach to Component slot.
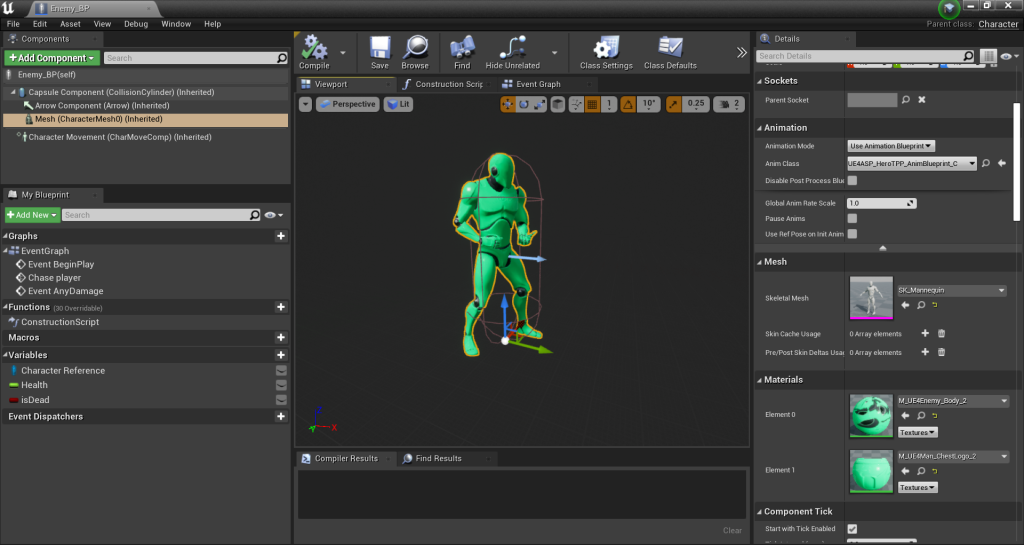
Now that I could shoot the gun, I needed enemies to fight, I started by creating a new character blueprint. I set the mesh of the character to the default Unreal mannequin. I then copied the materials used for the player character and made them green, this distinguishes the enemy from the player and also looks slightly like a stereotypical alien so seemed appropriate for the enemy color.
I now needed the enemy to chase the player. I first made a boolean called Is Dead, this refers to whether the enemy is currently alive or not. Then I made a custom, Chase Player, and connected a branch to it with the condition set to Is Dead. From false I connected AI MoveTo and set the pawn to self, self being the enemy. From On Success and On Fail, I connected the Chase Player custom event so that the enemy would forever chase the player. I created a character reference for the player and connected it to the Player to Chase node I added to the custom event so that the enemy would know to chase the player specifically.
Once the custom event was created, I placed Event BeginPlay and cast to the model used for the player character, setting it as the character reference, to that I connected the chase player custom event. Later on I will add enemy spawners that create multiple enemies. To prevent these enemies from clumping up too much when chasing the player, set the max walk speed of the enemies character movement to be one of three numbers. It is randomly assigned due to the Random Integer node.

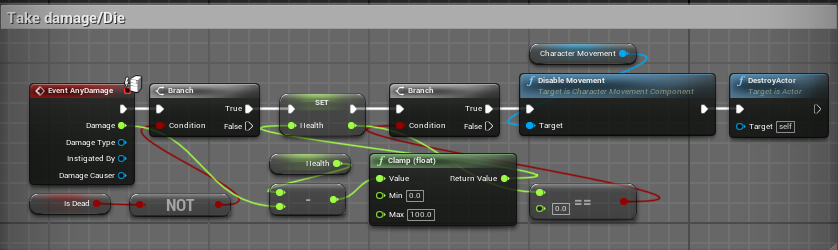
Once I had the enemy chasing the player, I had to cause them to take damage from bullets then die when their health is zero. I started by adding Event AnyDamage and connecting a branch with the condition set a Is Dead connected to NOT. I then created a float named health and set this. To this, I connected a clamp with the minimum set as 0 and the maximum set to 100. This would be the maximum and minimum amount of health the enemy could have. From the damage node of Event AnyDamage, I connected a float-float node and connected it to the clamp. This would cause damage to reduce the health. From the set health, I connected a branch with the condition set a float=float node set as 0 and connected to the clamp. From true, I connected disable movement and connected the enemies character movement to target. From that I connected DestroyActor. Overall, this will cause the enemy to take damage from bullets, spawn with 100 health and be destroyed when they reach 0 health.
As I now had an enemy that would chase the player and take damage, I needed to have it spawn within the level.
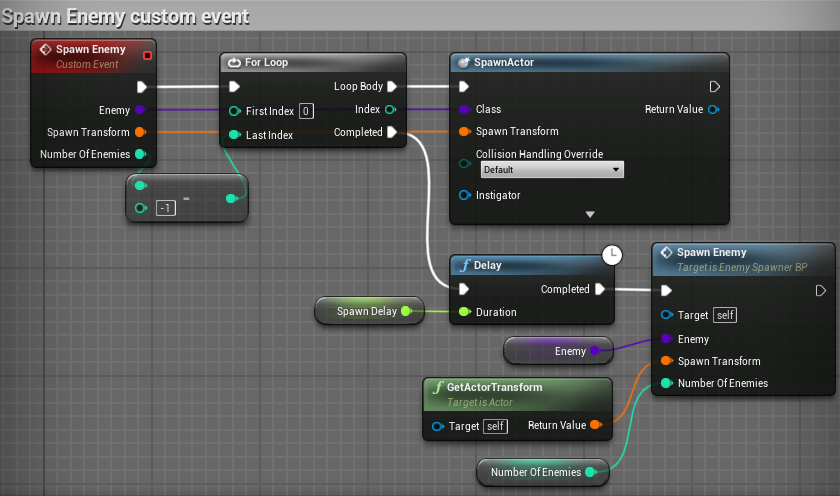
I started by creating a new custom event named Spawn Enemy. To this event, I added three inputs. Enemy, set as an actor, Spawn Transform, set as a transform and Number of Enemies, set as a integer. I then connected a For Loop to the event and connected Number of Enemies to Last Index through an integer-integer node. This is because I want to choose the amount of enemies each spawner produces and, as Unreal starts counting at 0, I needed to reduce the amount of enemies spawned to non. From the Loop Body, I connected SpawnActor. I then connected Enemy to the Class and Spawn Transform to the Spawn Transform. As I set the default value of Enemy to the Enemy BP, it would spawn the enemy made prior. From Completed, I connected a delay with the duration set to a custom variable named Spawn Delay, set to a float and made 5 seconds long. From this delay I connected another Spawn Enemy and connected Enemy, Spawn Transform and Number of Enemies as I had before. This would cause the spawner to spawn enemies, wait, then spawn more enemies. I made Spawn Delay and Number of Enemies instance editable so that I would be able to individually edit the amount of enemies spawned and the time between spawning more of each placed enemy spawner.
I next added a kill counter that would sit in the top right corner, updating the value each time the player killed an enemy.
I started by creating a variable within the player character named kills and set this to an integer. This variable will be used to count how many enemies have been killed.

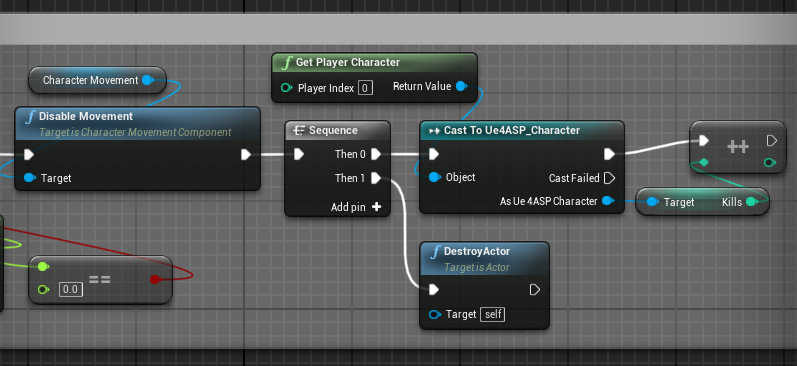
After this, I went into the enemy blueprint and added a sequence after disable movement. To Then 1, I connected destroy actor. To Then 2, I cast to the player character and added the kills variable. I added an increment int to the cast player character and connected kills. This will cause integer to rise by one each time an enemy is killed.
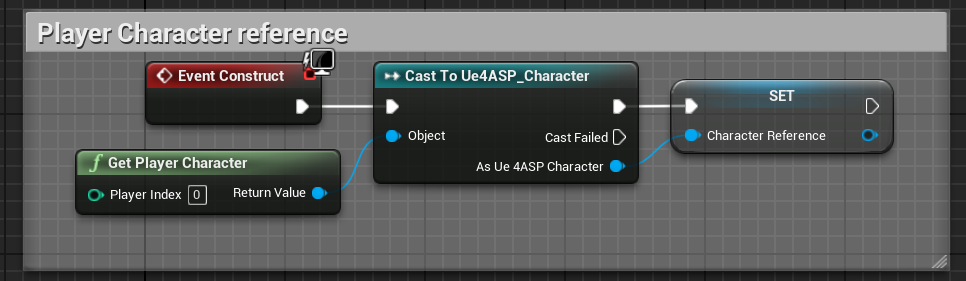
I then created a widget blueprint and added text, within the event graph of this I cast to the player character and set a reference. This would be used to use the kill variable within the widget blueprint.
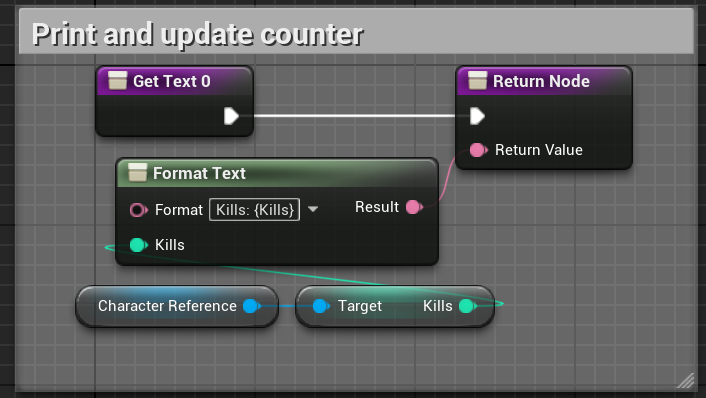
Finally, I added Format Text to the function I bound to the text. Within format text I wrote Kills: {Kills}. I then placed the character reference, connecting kills then connecting that to the kills input that appeared on Format Text. This input appeared as the {Kills} allows me to input a variable as the value.
[29/04/2022]
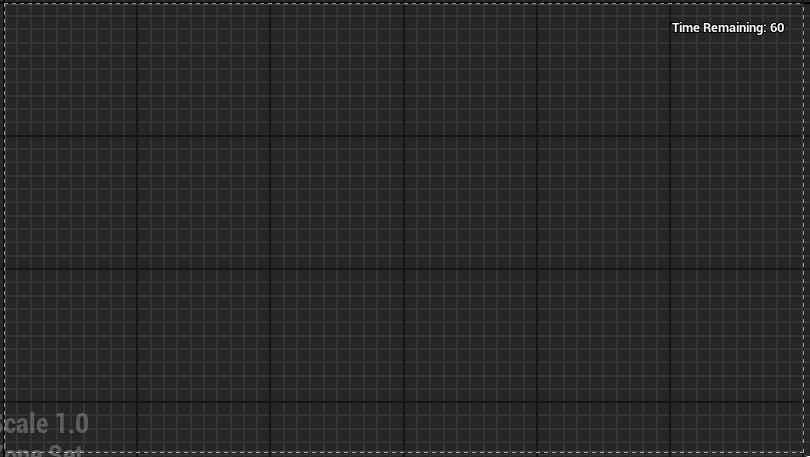
The next element I worked on was a timer showing the amount of time left within the game.
I started by creating a new widget and adding text to it. The written text is shown only as an example to see how it would fit on the screen.
To the text, I created a new binding. Within this binding I created a new variable, I set this to a float and named it time remaining. I then added format text, writing Time Remaining: {Time} within and connected it to the return node. Having {Time} at the end of format allows me to connect a variable that would be presented at the end of the string. To connected the Time Remaining variable to the Format Text, I connected it to a ToText (Float) and connected that to Format Text.

After I had made the timer widget, I went into the ThirdPersonGameMode event graph and created a new custom event named Game Timer. I then added Set Time by Event and connected the timer widget with a create widget node. The time of this node would be the amount of time remaining in the game, it is set to five in the screenshot as I was testing. I then set a reference for the timer widget so that I could use the Time Remaning variable made within. From that I place Add to Viewport so that the timer would be displayed within game. The next thing I would do is create a new custom event, Update Time. To this I added a Set Timer by Event and set the time as 1. I then set Time Remaining and set the Timer reference as the target. I then connected the Time Remaining input to a Get Timer Remaining Time by Handle and connected that to the timer of the Game Timer custom event. I then connected the Update Timer custom event at the end of the Game Timer custom event. This would cause the timer to count down by 1 each second.

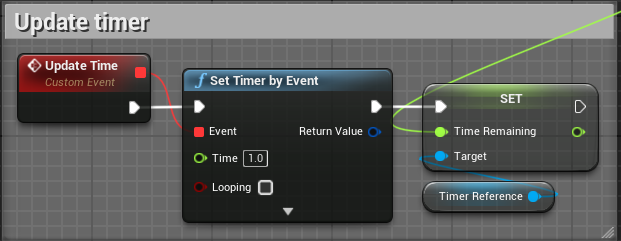
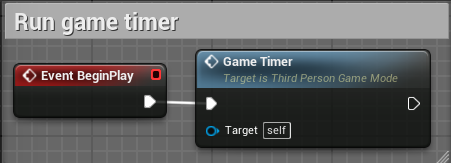
Finally, I connected the Game Timer custom event to Event BeginPlay to cause it to start counting down when the game begins.
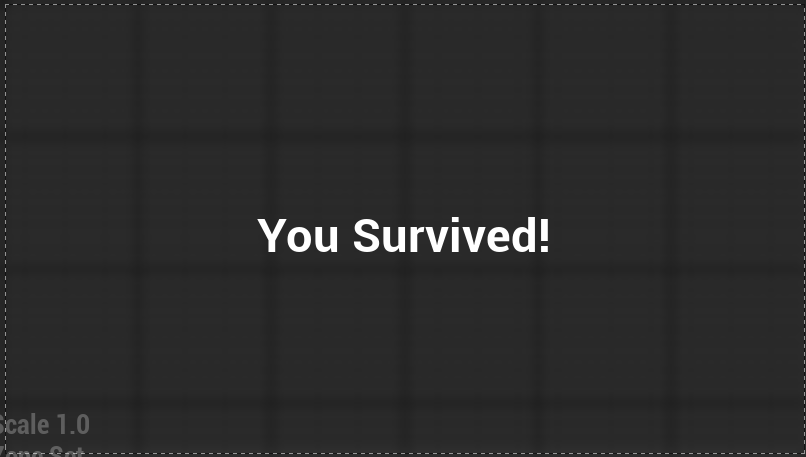
I next wanted something to occur when the timer reaches 0. I started by creating a new widget named Game Over. To this I added text, writing You Survived!, and adding background blur.
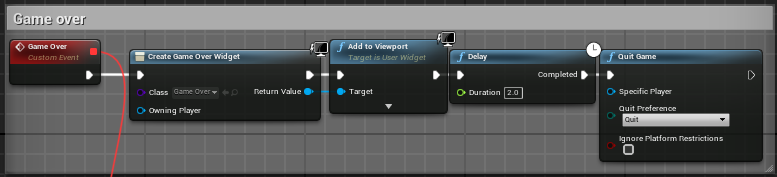
I then returned to the ThirdPersonGameMode event graph and created a custom event named Game Over then added a widget, that being the Game Over widget I had created. I connected Add to Viewport so that it would be displayed on the screen. To that I connected a delay, set to two seconds and, finally, added Quit Game. I connected the Game Over custom event to the event of the Game Timer custom events Set Time by Event. This causes the Game Over widget to be displayed on screen when the timer reaches 0 then, after two seconds, quits the game.
The final thing I wanted to add to the prototype was player health and enemy damage.
I started by creating a new widget, Player Health. To this widget, I added a progress bar and made it green.
I then added a binding to the progress of the bar. To Get Percent I added a casting to the player character. I then created float variables named Current Health and Max Health, set them both to 100, and connected them to a float/float to convert them to a percentage, attaching the output of that to the Return Value input of the Return Node.

Next I went into the player character event graph and added Event AnyDamage. From that I set the current health variable. To the input of this, I connected current health run through a float – float so that health would be subtracted when damage was taken. From the set current health I connect a branch, the condition of this branch was set as <= zero. To true of the branch, I connected disable movement and the Game Over widget I had created. Finally, I added a Delay and Quit Game. Overall, this would disable player movement, display the death overlay and, after a delay, quit the game.

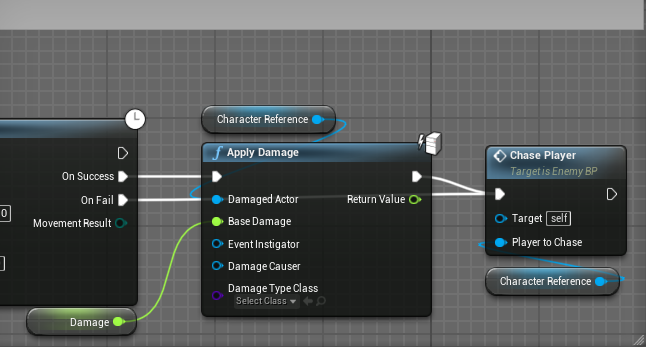
To cause the enemy to damage the player I went back to the Chase Player custom event. From On Success of the AI MoveTo I connected Apply Damage with the Damaged Actor being set as the Character Reference for the player character. To set a specific amount of damage dealt by the enemy, I promoted Base Damage to a variable, naming it Damage, and set it to 5.
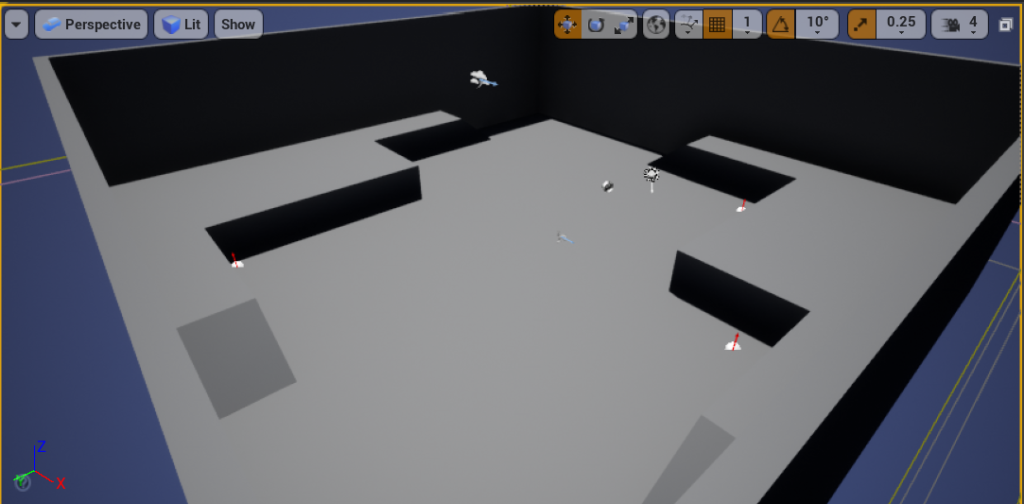
Using the arena from the ThirdPerson template as an outline, I built a simple level for the player. This was made with simple geometry, I edited the cube to make ramps. The player would move around this level, killing enemies and avoiding damage to survive until the timer runs out.
Epic Games (2014) Animation Starter Pack [Asset Pack] Available online: https://www.unrealengine.com/marketplace/en-US/product/animation-starter-pack [Accessed 27/04/2022]
Deadghost Interactive (2018) FPS Weapon Bundle [Asset Pack] Available online: https://www.unrealengine.com/marketplace/en-US/product/fps-weapon-bundle [Accessed 27/04/2022]
Matt Aspland (2021) Third Person Shooter Minigame Unreal Engine [Video series] Available online: https://www.youtube.com/watch?v=95oz8V5U8GQ&list=PLQN3U_-lMANNDOnDEtIWQ5GaBtzbTI1Sf [Accessed 27/04/2022]